I didn't trust the velcro that came with the PocketWizard Flex TT5 so I had to design my own solution.
I did a lot of searching on Google for what others had come up with but didn't quite like any of the solutions I found.
I wanted something that I could trust and that worked well.
This is what I came up with for a very strong PocketWizard FlexTT5 attachment solution.
Included are screenshots, parts needed and a PDF of the pattern.
What you will need:
- 1/4" - 20 x 1/2" Machine Screws (bought mine at Menard's home improvement store)
- #14 Finishing Washers (also bought at Menard's home improvement store)
- Sticky Back Velcro - Doesn't need to be industrial strength. (you can use the velcro that came with the FlexTT5)
- Your choice of material. Should be somewhat strong, something that resist coming apart in strands. I used two different materials and sewed them together for strength.
- Sewing Machine - I borrowed my moms.
- My Pattern - Download here.
- Pins like these for pinning together the 2 pieces of fabric.
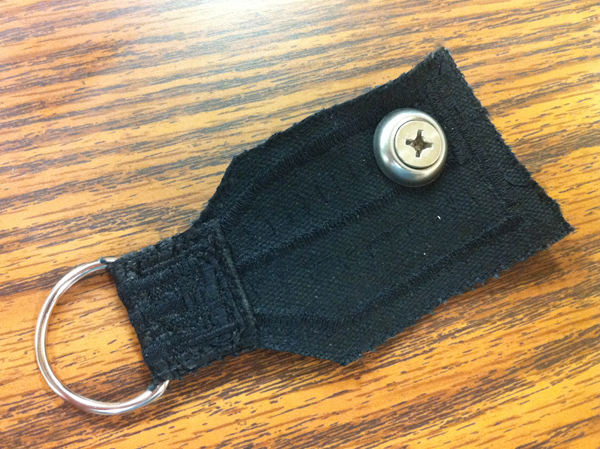
This is the finished FlexTT5 holder.
You simply screw the screw into the FlexTT5 making sure to have the washer in place and hang the d-ring over the light stand or C stand.
I'll get more pics of the finished product after adding the velcro but see the pic below for why the velcro is needed.
It holds it very securely but because of the placement of the screw on the FlexTT5 it falls downward. So just put a little rectangle of velcro (not shown in this pic) on top of where the batteries go making sure not to cover the battery door, which should be out of the way on the end anyways, and I made sure not to cover the Serial Number.
The easiest way to do it is to stick the two sides of velcro together so they are aligned and peel one side first to place the velcro onto the FlexTT5. Next peel the backing off the other side and press the holder material onto the velcro rubbing to strongly adhere it. Doing it that way you have a perfect match-up.
This design makes it easy to make any setting adjustments on the FlexTT5.
NOTE: You can leave the holders on the Flex's
unless you need to mount a Canon or Nikon Flash onto the hot-shoe. If you do need to mount a Flash just unscrew the holder and remove.
Build Process
1) First cut the pattern out after printing it cutting along the outside lighter grey line. Put the pattern onto your material and trace it with fabric marker like
this.
2) Cut out the material following the outside lighter grey line. Do this for both pieces if you are using two layers of fabric as I did for strength.
3) With a ruler mark 1/4" in from edge all the way around and draw a line to sew along. Be sure that the side you are marking along will be facing out when sewn.
4) Now place one piece of fabric on top of the other and pin them together.
5) Sew along the 1/4" line all of the way around.
6) Now with a strong stitch sew along the inside of the 1/4" lines.
 |
| Stitch just inside of the 1/4" line. |
7) Cut just to the outside of the inner 1/4" line that you just sewed around to trim the excess material off.
 |
| Shown after excess was trimmed off |
8) Now
sew a few patterns through the middle to strengthen the holder. (see pic below)
 |
| Tough inner stitching |
9) Now
mark the screw hole location which is
5/8" in from the sides in the location shown. Mark a 1/4" circle for screw size.
NOTE: Side shown will be the side the screw head and finish washer is on.
 |
| Mark screw hole location |
10) Now
sew screw hole strengthening stitches around the screw hole location.
NOTE: Use a nice beefy stitch for the screw hole!
 |
| Stitching to strengthen screw hole |
11) Now
slide the D-Ring over the skinny end into location to be stitched secure.
12)
Fold over the strap and securely stitch the D-ring in place. Make sure when you start a stitch you have clearance for the sewing machine foot.
USE
STRONG stitching for the d-ring attachment!
 |
| Stitching the d-ring in place |
13)
CAREFULLY stitch lengthwise up to just before the d-ring!
Make sure you stop just a little before the d-ring so you don't shatter the needle or damage anything. GO SLOW!
14) Using some kind of backing
CAREFULLY cut out the screw hole with a razor cutter or X-acto knife. Don't cut screw hole strengthening stitching.
I cut from one side and then the other.
After cutting out the screw hole clean it up by placing a screw through, resting the screw head on the table and CAREFULLY cutting around the screw to trim excess once again taking care not to cut stitching.
 |
| CAREFULLY trimming screw hole excess! |
|
|
15)
Mount FlexTT5 to holder. Now simply align holder with FlexTT5 and place screw with finishing washer into screw hole.
With a screw driver carefully screw the screw into the FlexTT5 taking care not to cross thread the screw. If you have to reverse direction with the screw driver to align the screw until you can get it started.
16) Align velcro and stick both sides together. Now cut about a 1" strip of velcro for each holder your making.
Put about a 1" rectangle of velcro on top of where the batteries go making sure not to cover the battery door, which should be out of the way on the end anyways, and I made sure not to cover the Serial Number.
The easiest way to do it is to stick the two sides of velcro together so they are aligned and peel one side first to place the velcro onto the FlexTT5. Next peel the backing off the other side and press the holder material onto the velcro rubbing to strongly adhere it. Doing it that way you have a perfect match-up.
 |
| Velcro placement |
This is how you mount the FlexTT5 to the light stand or C stand.
I trust this for my own use to hold my FlexTT5 to my lighting stands much more than just the velcro that was provided.
Of course if you make this correctly it should more than do the job but here's my disclaimer.
This information is provided free of charge and any and all who use this information do so at their own risk.