Tuesday, December 20, 2011

Saturday, December 17, 2011

PocketWizard FlexTT5 Light Stand Holder
I didn't trust the velcro that came with the PocketWizard Flex TT5 so I had to design my own solution.
I did a lot of searching on Google for what others had come up with but didn't quite like any of the solutions I found.
I wanted something that I could trust and that worked well.
This is what I came up with for a very strong PocketWizard FlexTT5 attachment solution.
Included are screenshots, parts needed and a PDF of the pattern.
What you will need:


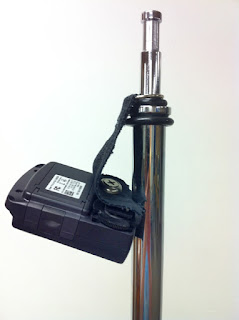
This is the finished FlexTT5 holder.

You simply screw the screw into the FlexTT5 making sure to have the washer in place and hang the d-ring over the light stand or C stand.
I'll get more pics of the finished product after adding the velcro but see the pic below for why the velcro is needed.
It holds it very securely but because of the placement of the screw on the FlexTT5 it falls downward. So just put a little rectangle of velcro (not shown in this pic) on top of where the batteries go making sure not to cover the battery door, which should be out of the way on the end anyways, and I made sure not to cover the Serial Number.
The easiest way to do it is to stick the two sides of velcro together so they are aligned and peel one side first to place the velcro onto the FlexTT5. Next peel the backing off the other side and press the holder material onto the velcro rubbing to strongly adhere it. Doing it that way you have a perfect match-up.
This design makes it easy to make any setting adjustments on the FlexTT5.
NOTE: You can leave the holders on the Flex's unless you need to mount a Canon or Nikon Flash onto the hot-shoe. If you do need to mount a Flash just unscrew the holder and remove.
Build Process
1) First cut the pattern out after printing it cutting along the outside lighter grey line. Put the pattern onto your material and trace it with fabric marker like this.
2) Cut out the material following the outside lighter grey line. Do this for both pieces if you are using two layers of fabric as I did for strength.
3) With a ruler mark 1/4" in from edge all the way around and draw a line to sew along. Be sure that the side you are marking along will be facing out when sewn.
4) Now place one piece of fabric on top of the other and pin them together.
5) Sew along the 1/4" line all of the way around.

6) Now with a strong stitch sew along the inside of the 1/4" lines.
7) Cut just to the outside of the inner 1/4" line that you just sewed around to trim the excess material off.
8) Now sew a few patterns through the middle to strengthen the holder. (see pic below)
9) Now mark the screw hole location which is 5/8" in from the sides in the location shown. Mark a 1/4" circle for screw size.
NOTE: Side shown will be the side the screw head and finish washer is on.
10) Now sew screw hole strengthening stitches around the screw hole location.
NOTE: Use a nice beefy stitch for the screw hole!
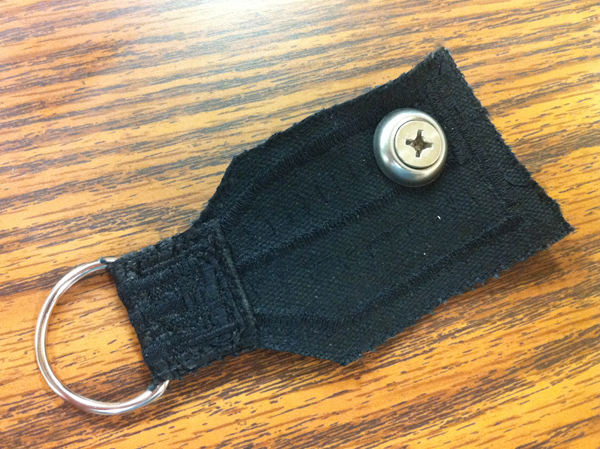
11) Now slide the D-Ring over the skinny end into location to be stitched secure.

12) Fold over the strap and securely stitch the D-ring in place. Make sure when you start a stitch you have clearance for the sewing machine foot.
USE STRONG stitching for the d-ring attachment!
13) CAREFULLY stitch lengthwise up to just before the d-ring!
Make sure you stop just a little before the d-ring so you don't shatter the needle or damage anything. GO SLOW!

14) Using some kind of backing CAREFULLY cut out the screw hole with a razor cutter or X-acto knife. Don't cut screw hole strengthening stitching.
I cut from one side and then the other.
After cutting out the screw hole clean it up by placing a screw through, resting the screw head on the table and CAREFULLY cutting around the screw to trim excess once again taking care not to cut stitching.
15) Mount FlexTT5 to holder. Now simply align holder with FlexTT5 and place screw with finishing washer into screw hole.
With a screw driver carefully screw the screw into the FlexTT5 taking care not to cross thread the screw. If you have to reverse direction with the screw driver to align the screw until you can get it started.

16) Align velcro and stick both sides together. Now cut about a 1" strip of velcro for each holder your making.
Put about a 1" rectangle of velcro on top of where the batteries go making sure not to cover the battery door, which should be out of the way on the end anyways, and I made sure not to cover the Serial Number.
The easiest way to do it is to stick the two sides of velcro together so they are aligned and peel one side first to place the velcro onto the FlexTT5. Next peel the backing off the other side and press the holder material onto the velcro rubbing to strongly adhere it. Doing it that way you have a perfect match-up.
This is how you mount the FlexTT5 to the light stand or C stand.

I trust this for my own use to hold my FlexTT5 to my lighting stands much more than just the velcro that was provided.
Of course if you make this correctly it should more than do the job but here's my disclaimer.
This information is provided free of charge and any and all who use this information do so at their own risk.
I did a lot of searching on Google for what others had come up with but didn't quite like any of the solutions I found.
I wanted something that I could trust and that worked well.
This is what I came up with for a very strong PocketWizard FlexTT5 attachment solution.
Included are screenshots, parts needed and a PDF of the pattern.
What you will need:
- 1/4" - 20 x 1/2" Machine Screws (bought mine at Menard's home improvement store)

- #14 Finishing Washers (also bought at Menard's home improvement store)

- 1" D-Rings - Like these.
- Sticky Back Velcro - Doesn't need to be industrial strength. (you can use the velcro that came with the FlexTT5)
- Your choice of material. Should be somewhat strong, something that resist coming apart in strands. I used two different materials and sewed them together for strength.
- Sewing Machine - I borrowed my moms.
- My Pattern - Download here.
- Fabric marker like this.
- Pins like these for pinning together the 2 pieces of fabric.
This is the finished FlexTT5 holder.
You simply screw the screw into the FlexTT5 making sure to have the washer in place and hang the d-ring over the light stand or C stand.
I'll get more pics of the finished product after adding the velcro but see the pic below for why the velcro is needed.

It holds it very securely but because of the placement of the screw on the FlexTT5 it falls downward. So just put a little rectangle of velcro (not shown in this pic) on top of where the batteries go making sure not to cover the battery door, which should be out of the way on the end anyways, and I made sure not to cover the Serial Number.
The easiest way to do it is to stick the two sides of velcro together so they are aligned and peel one side first to place the velcro onto the FlexTT5. Next peel the backing off the other side and press the holder material onto the velcro rubbing to strongly adhere it. Doing it that way you have a perfect match-up.
This design makes it easy to make any setting adjustments on the FlexTT5.
NOTE: You can leave the holders on the Flex's unless you need to mount a Canon or Nikon Flash onto the hot-shoe. If you do need to mount a Flash just unscrew the holder and remove.
Build Process
1) First cut the pattern out after printing it cutting along the outside lighter grey line. Put the pattern onto your material and trace it with fabric marker like this.
2) Cut out the material following the outside lighter grey line. Do this for both pieces if you are using two layers of fabric as I did for strength.
3) With a ruler mark 1/4" in from edge all the way around and draw a line to sew along. Be sure that the side you are marking along will be facing out when sewn.
4) Now place one piece of fabric on top of the other and pin them together.
5) Sew along the 1/4" line all of the way around.

6) Now with a strong stitch sew along the inside of the 1/4" lines.
 |
| Stitch just inside of the 1/4" line. |
 |
| Shown after excess was trimmed off |
8) Now sew a few patterns through the middle to strengthen the holder. (see pic below)
 |
| Tough inner stitching |
9) Now mark the screw hole location which is 5/8" in from the sides in the location shown. Mark a 1/4" circle for screw size.
NOTE: Side shown will be the side the screw head and finish washer is on.
 |
| Mark screw hole location |
10) Now sew screw hole strengthening stitches around the screw hole location.
NOTE: Use a nice beefy stitch for the screw hole!
 |
| Stitching to strengthen screw hole |
11) Now slide the D-Ring over the skinny end into location to be stitched secure.

12) Fold over the strap and securely stitch the D-ring in place. Make sure when you start a stitch you have clearance for the sewing machine foot.
USE STRONG stitching for the d-ring attachment!
 |
| Stitching the d-ring in place |
Make sure you stop just a little before the d-ring so you don't shatter the needle or damage anything. GO SLOW!

14) Using some kind of backing CAREFULLY cut out the screw hole with a razor cutter or X-acto knife. Don't cut screw hole strengthening stitching.
I cut from one side and then the other.
After cutting out the screw hole clean it up by placing a screw through, resting the screw head on the table and CAREFULLY cutting around the screw to trim excess once again taking care not to cut stitching.
 | ||
| CAREFULLY trimming screw hole excess! |
15) Mount FlexTT5 to holder. Now simply align holder with FlexTT5 and place screw with finishing washer into screw hole.
With a screw driver carefully screw the screw into the FlexTT5 taking care not to cross thread the screw. If you have to reverse direction with the screw driver to align the screw until you can get it started.

16) Align velcro and stick both sides together. Now cut about a 1" strip of velcro for each holder your making.
Put about a 1" rectangle of velcro on top of where the batteries go making sure not to cover the battery door, which should be out of the way on the end anyways, and I made sure not to cover the Serial Number.
The easiest way to do it is to stick the two sides of velcro together so they are aligned and peel one side first to place the velcro onto the FlexTT5. Next peel the backing off the other side and press the holder material onto the velcro rubbing to strongly adhere it. Doing it that way you have a perfect match-up.
 |
| Velcro placement |
This is how you mount the FlexTT5 to the light stand or C stand.

I trust this for my own use to hold my FlexTT5 to my lighting stands much more than just the velcro that was provided.
Of course if you make this correctly it should more than do the job but here's my disclaimer.
This information is provided free of charge and any and all who use this information do so at their own risk.
Friday, November 4, 2011

Friday, October 21, 2011
Egyptian Craftsmanship Almost Lost to History
Seeing this makes me wish Walmart wasn't so big and the way things are done now!
We are all losing too much knowledge because the crafts aren't being handed down but this video is encouraging.
I hope that crafts in America and elsewhere gain interest too! There is so much culture around the world that could be lost. I long for bygone days. I would much rather have something handmade for most things.
I love technology but when I watch old Hitchcock movies and other old movies it makes me kind of wish I was living in that era. When men wore suits and hats, people used typewriters, went to locally owned bookstores, and in some ways life was simpler. I guess thats why I love old movies, because I can feel like I'm in that era.
Thursday, October 20, 2011
Great New National Geographic Shows for Makers
Like making things?
If you like engineering, making, fabricating and building things here are
new Nat Geo shows you should watch.
• How Hard Can It Be
• Rocket City Rednecks
• Engineering Connections
• Mad Scientist
If you like engineering, making, fabricating and building things here are
new Nat Geo shows you should watch.
• How Hard Can It Be
• Rocket City Rednecks
• Engineering Connections
• Mad Scientist
Tuesday, October 18, 2011
Monday, October 17, 2011
Oldschool Kluge Letterpress Printer In Action
KLUGE from Northern Lights on Vimeo.
I've always liked old things. I love antiques, old movies, old cars, old cameras, well you get the idea.
I also like some of the old ways of doing things and the quality you get from those methods.
I thought I would share this video because I love seeing this sort of thing.
Will His Metal Fabrication Business Be Passed On Or Die?
I would love to learn from him! It appears that maybe his children/grandchildren aren't as interested.
Pictures of Photoshop Editing of Airplane Cockpit for 360 Pano
This is from a post on my old blog but I thought I would share it here.
Here are a couple of iPhone shots (not great but work for a blog post) of my workspace while I was working on 360 panoramic shots of a biplanes cockpit. Just thought I would post this for those interested in graphic design and photography. I sometimes find things like this inspirational.
See the High Quality Full Screen capable 360's here!
View Well-Equipped Panel Here
Well equipped means some digital avionics in a biplane!
View Full Glass Panel Here
Full glass means all new digital avionics in a biplane!


We went back a few days later to shoot more normal photography shots.
Saturday, October 15, 2011
Biplane Wing Executive Desk
Check out this Awesome Flying Executive Desk built at a present day biplane factory!
These are HAND MADE! The craftsman who makes these is the same craftsman that makes WACO's biplane wing structures.

I observed the craftsman while at work on biplane wings and the craftsmanship and knowledge he posses is amazing!
See more pics with the link & linked image above.
Also check out this Waco Engine Table!
These are HAND MADE! The craftsman who makes these is the same craftsman that makes WACO's biplane wing structures.
I observed the craftsman while at work on biplane wings and the craftsmanship and knowledge he posses is amazing!
See more pics with the link & linked image above.
Also check out this Waco Engine Table!
Friday, October 14, 2011
creativeLIVE!
If you haven't checked out any of creativeLIVE's inspiring training you should!
The sessions are streamed live when they are recorded for FREE! Usually, maybe always, you can purchase the videos at a reduced rate during the recording/streaming event.
Check out some more of their videos here:
Check out creativeLIVE here.
The sessions are streamed live when they are recorded for FREE! Usually, maybe always, you can purchase the videos at a reduced rate during the recording/streaming event.
Check out some more of their videos here:
Check out creativeLIVE here.
Thursday, October 13, 2011
Excellent Welding Tools!
Strong Hand Tools make some of the best and most versatile welding tools there are!
Strong Hand Tools that I have are pictured below. I have a BIG wish list of their tools though!


See Strong Hand Tools Product Overview video below.
Check out Strong Hand Tools other videos here.
Definitely on my want list is the Build Pro Modular Welding Table in action in the videos below!
This thing is so useful and makes precision set up easy!
It's not cheap but the ability to do precision set ups and set up fixtures for repeatable part welds is worth it! You will know everything IS square when you set up on this table!
See Strong Hands Build Pro Table overview video below.
Awesome!
Check out Strong Hand Tools other YouTube videos here.
Awesome Possible New Feature for Next Photoshop!
Demo at Adobe MAX of a feature that probably will be in Photoshop CS6!
It's a deblur filter that appears to work really well. It analyzes the camera movement that caused the blur and then corrects it!
It's a deblur filter that appears to work really well. It analyzes the camera movement that caused the blur and then corrects it!
Tuesday, October 11, 2011
The Sounds of Transformers
Really interesting video on the sound design for Transformers Dark of the Moon.
SoundWorks Collection: The Sound of Transformers: Dark of the Moon from Michael Coleman on Vimeo.
Check out SoundWorks other videos on Vimeo too, they are all interesting.
SoundWorks Collection: The Sound of Transformers: Dark of the Moon from Michael Coleman on Vimeo.
Check out SoundWorks other videos on Vimeo too, they are all interesting.
Saturday, October 8, 2011
American Craftsman Project
Just found a inspiring site which profiles the American Craftsman.
Portrait of the American Craftsman
Portrait of the American Craftsman
Sunday, September 25, 2011
Metal Fabrication Welding Videos Must Follow
This is one of my favorite, if not my favorite, YouTube channel!
If your into metal fabrication or are interested in getting into it you should see these videos and his site.
He covers most common types of welding and setting up to do welds as well as many other useful tips.
Welding Tips and Tricks ( weldingtipsandtricks.com )
Check out all of his YouTube videos and subscribe here.
Digital Painting Videos You MUST Subscribe To!
If you are into digital painting or art and graphic design in general you should checkout FZD School on YouTube and subscribe!
The videos are very informative and inspirational. Feng Zhu is a professional who has worked on many movies and other projects and has his own conceptual design school.
 |
| Concept Design Digital Painting |
Images used with permission
You can also find the videos presented in a easily viewable way
on FZD Schools site here: Free Tutorials
Saturday, September 24, 2011
A Brochure of Mine Featured on a Blog
It's just a guys blog (no offense it looks like a great blog!) not any sort of official recognition but it still felt good.
with a link for Beautiful Brochure Design looking to be inspired and I was inspired and encouraged! :)
What was really strange is the way I came across it.
I was doing a Twitter search for graphic design and clicked on the first or second tweet I saw
TimothyWhalin: Showcase Of Beautiful Brochure #Design http://t.co/1uQTum9E
with a link for Beautiful Brochure Design looking to be inspired and I was inspired and encouraged! :)
My brochure is the fourth down.
I am now of course following @TimothyWhalin and his blog!
 |
| Click brochure image above to see a full screen capable 360° panorama! |
The WACO biplane 360 linked to the brochure image above was the shoot I was on in the 2 previous blog entries below.
Wednesday, September 21, 2011
Waco Aircraft Factory Photos
I am posting some of the normal photos I took when we were at
WACO Classic Aircraft Corporation doing a 360 degree photography panoramic shoot of cockpits for them. You just don't see quality craftsmanship like this anymore! Just amazing work! You have to see these wooden wing frames that are made the way they use to be for the biplanes in the 30's by real craftsmen!
WACO Classic Aircraft Corporation doing a 360 degree photography panoramic shoot of cockpits for them. You just don't see quality craftsmanship like this anymore! Just amazing work! You have to see these wooden wing frames that are made the way they use to be for the biplanes in the 30's by real craftsmen!
 |
| Amazing craftsmanship! You have to see it in person to realize how well it is made and to what extent the attention to detail is! |
 |
| A view of a whole wing structure. Craftsmanship and attention to detail like you wouldn't believe! |
 |
| Lacking the color treatment of the other photos posted in the posting but you get to see the pretty vibrant red! |
Our WACO 360 Panoramic Work Shown on General Aviation News
General Aviation News has a post about WACO's new YMF-5D 360° cockpit virtual tours! This has been a great project to do. Very interesting subject matter. The WACO biplanes are true works of art. It's not often these days that you see that kind of craftsmanship.
See our other High Quality Full Screen 360 degree Panoramic Photography work here: Dynamite Inc 360
Other links:
Click screenshot above to go to General Aviation News site.
- WACO Classic Aircraft Corporation
- WACO biplane well equipped cockpit 360 panoramic
- WACO biplane full glass panel cockpit 360 panoramic
 |
| A screenshot from General Aviation News |
Click screenshot above to go to General Aviation News site.
Cool Video On A Professional Video Shoot! – Inspiration
I often find videos or examples of work other people are doing inspiring. I especially like video’s of others working, most likely because I’m visual and learn best from watching something being done. This is a video from Chase Jarvis and he is using the RED One digital cinema camera and the Nikon D3s HD DSLR on location shooting skateboarding and glass blowing. He shows some tricks of the trade and how he got his angles.
Subscribe to:
Comments (Atom)